
In the world of baking, every sweet pastry and fluffy loaf is not a product of chance, but the culmination of precise techniques, meticulous attention to detail, and accumulated experience. Whether you’re a novice just stepping into the baking realm or an enthusiast with a portfolio of creations, you crave the key methods that dramatically boost your success rate. The“10 Ultimate Secrets to Perfect Baking Success”is your essential guide to breaking the spell of failure and consistently producing delicious results. Master these secrets, and you’ll bid farewell to the frustration of“following the recipe yet ending up with poor texture or collapsed shapes.”You’ll effortlessly unlock baking’s limitless possibilities, ensuring that every time your oven chimes, you’ll be rewarded with a sense of accomplishment and delightful surprises for your taste buds.
1. Measure Precisely, Reject “Approximate”
Baking is often called “a chemistry experiment in the kitchen.” The proportions of ingredients directly impact the final product’s texture and form. Precise measurement is the first step toward perfect baking—the most fundamental and crucial one. A common mistake among beginners is adding ingredients by feel—like “roughly two scoops of flour” or “a pinch of sugar.” Yet even these slight discrepancies can lead to overdry dough that won’t hold shape, flat cakes lacking fluffiness, or biscuits with an overly hard texture.
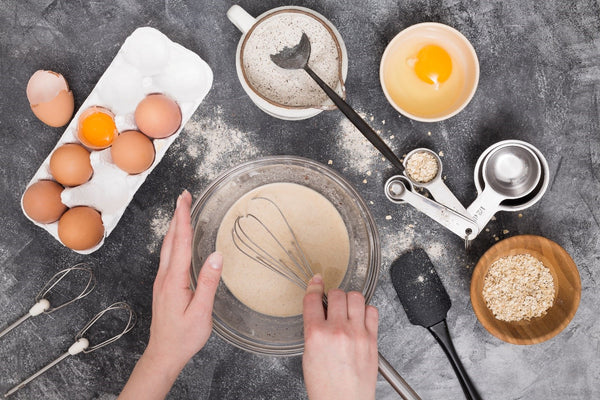
The correct approach is to equip yourself with professional baking tools, including a digital scale and measuring spoons/cups. Opt for a scale with 1-gram precision to accurately weigh solids like flour, butter, and sugar. Measuring spoons and cups are ideal for liquids such as milk, heavy cream, and egg mixtures. When measuring, pay attention to the state of ingredients. For example, flour should be sifted before weighing, as it tends to clump during storage. Sifting increases its volume; weighing clumped flour directly will result in an overestimated weight, leading to a coarse texture in the final product. If butter requires “softening,” remove it from the refrigerator in advance and let it sit until it yields to gentle finger pressure. Only then will the measured weight be accurate. Butter that is too hard or melted into liquid will affect subsequent whipping and the dough’s elasticity.
II. Controlling Ingredient Temperature: Details Determine Success
The impact of ingredient temperature on baking is often overlooked, yet it is a crucial detail that determines success or failure. Different ingredients perform optimally at specific temperatures—such as butter, eggs, and heavy cream. Improper temperatures directly affect batter emulsification and whipping results, ultimately influencing the texture and appearance of the final product.
Take butter as an example: when making cookies or puff pastry, butter must be softened to a “creamy paste” consistency. At this stage, the fat particles in the butter blend more effectively with sugar. When whipped, it incorporates more air, resulting in a crisp, light, and fluffy texture. If butter is too cold, it cannot be whipped sufficiently, resulting in a dense, hard texture. If it is too warm and melts into liquid, it causes the batter to separate, leading to a greasy, flat-tasting finished product lacking layers. The same principle applies to eggs. When making sponge cakes or chiffon cakes, eggs at room temperature whip more easily than refrigerated ones. The resulting egg mixture is also more stable, providing better structural support to prevent the cake from collapsing. Using refrigerated eggs not only makes whipping more difficult but may also cause uneven emulsification due to low temperature, affecting the cake’s texture and height.
Additionally, heavy cream requires refrigeration before whipping, and the ambient temperature during whipping should not be too high. Otherwise, it may become over-whipped and develop a grainy texture, rendering it unsuitable for cake decoration. Therefore, plan ahead before baking: remove ingredients that need to be at room temperature from the refrigerator in advance to allow them to reach their optimal state, laying the foundation for successful baking.
III. Use Flour Types Appropriately; Do Not Substitute Arbitrarily
Flour is one of the most fundamental ingredients in baking. However, different types of flour vary in protein content and characteristics, and their suitability for specific baked goods differs significantly. Arbitrarily substituting one type of flour for another can directly lead to baking failures. Many beginners are unaware of flour classifications. Using high-gluten flour meant for bread in cakes, or low-gluten flour meant for cakes in bread, often results in cakes with a dense, steamed bun-like texture, or bread lacking sufficient rise and chewiness.
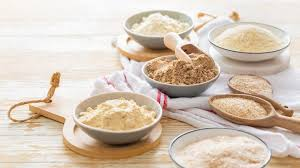
Common baking flours are primarily categorized as high-gluten, medium-gluten, and low-gluten. High-gluten flour contains 11%-13% protein, offering strong gluten development and excellent elasticity. It’s ideal for bread, pizza crusts, and other items requiring structural support and chewiness. During fermentation, it effectively traps yeast-produced gases, resulting in larger bread volumes and a resilient texture. Medium-gluten flour contains 8%–10% protein, offering moderate gluten strength. It’s suitable for Chinese-style pastries like steamed buns, dumplings, and wonton wrappers. When low-gluten flour is unavailable, cornstarch can be added to reduce gluten strength and temporarily substitute it (typically mixing medium-gluten flour with cornstarch at a 4:1 ratio approximates low-gluten flour’s properties). Low-gluten flour contains 6%–8% protein, has weak gluten strength, and poor elasticity. It is ideal for cakes, cookies, tart shells, and other foods requiring a soft, crumbly texture, preventing the finished product from becoming dense due to excessive gluten strength.
Therefore, carefully read recipes before baking to identify the required flour type. If the specified flour is unavailable, substitute based on flour characteristics rather than mixing types indiscriminately. This ensures the final product achieves the desired texture and form.
IV. Yeast Activity Testing to Prevent Fermentation Failure
For baked goods requiring fermentation—such as bread, steamed buns, and Danish pastries—yeast activity directly determines fermentation effectiveness, ultimately affecting the final product’s volume and texture. Using inactive yeast will prevent proper dough fermentation no matter how precise subsequent steps are, resulting in a dense, rock-like loaf—a common failure among novice bread bakers.
Yeast comes in two main forms: dry yeast and fresh yeast. Dry yeast is further categorized into instant dry yeast and active dry yeast. Instant dry yeast can be mixed directly with flour, while active dry yeast must first be dissolved in lukewarm water (35°C–40°C, not hot to the touch) with a small amount of sugar to activate it. After resting for 5–10 minutes, a fine foam on the surface indicates good yeast activity. If no or minimal foam forms, the yeast is inactive and unusable. Fresh yeast is more potent than dry yeast but has a shorter shelf life and requires refrigeration. Always verify freshness before use; discard immediately if it exhibits off-odors, hardened texture, or mold.
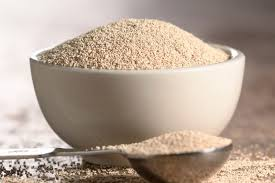
Additionally, fermentation environment temperature and humidity affect yeast activity. Optimal fermentation conditions are 28°C–32°C (82°F–90°F) with 70%–80% humidity. Low temperatures slow fermentation and extend preparation time, while high temperatures kill yeast, causing fermentation failure. Therefore, when baking, utilize the oven’s proofing function or place a bowl of warm water in a sealed space to create an optimal fermentation environment. Furthermore, only proceed with dough kneading and fermentation after confirming yeast activity, thereby preventing baking failures caused by yeast issues.
V. Mastering Whipping Techniques for Ideal Texture
Whipping is a common baking technique. Whether working with eggs, butter, or whipping cream, proper whipping methods create stable foam structures that yield light, airy, and delicate textures in finished products. Incorrect whipping, however, prevents ingredients from reaching their optimal state, compromising the final quality.
Take whipping eggs as an example: When making chiffon cake, you need to whip egg whites. After adding fine granulated sugar to the whites, use an electric mixer on medium speed. During whipping, avoid letting the beaters touch the bowl walls to prevent incorporating air, which can destabilize the meringue. Stop beating when the meringue reaches the “stiff peak” stage (when the whisk is lifted, the meringue forms a straight, small peak that does not bend). Overbeating will cause the meringue to become grainy, lose elasticity, and fail to support the cake structure. Underbeating, with insufficient air incorporated, will result in a collapsed cake with a dense texture.
When whipping butter, first beat softened butter on low speed until smooth. Gradually add granulated sugar in multiple additions, ensuring each addition is fully incorporated before adding the next. This allows the butter to better incorporate air, resulting in whipped butter that increases in volume, lightens in color, and becomes a fluffy paste. Adding too much sugar at once prevents proper incorporation, resulting in grainy butter that compromises the batter’s smooth texture.
When whipping heavy cream, ensure the cream, beaters, and mixing bowl are chilled. Begin at low speed, gradually increasing speed. Once distinct ribbons form, switch to low speed and continue until desired consistency is reached (e.g., for frosting, whip to “stiff peaks” where beaters lift with cream forming a straight, upright peak). If whipped at too high a speed or temperature, the cream can easily become over-whipped, resulting in separation of oil and water, rendering it unusable.
VI. Batter Mixing Techniques to Prevent Gluten Formation
The method of mixing batter is crucial for the texture of baked goods, especially when making cakes, cookies, and other items requiring a soft, fluffy texture. Incorrect mixing techniques can cause gluten to form in the flour, resulting in a dense, coarse texture that lacks the desired lightness. Many beginners instinctively mix batter by stirring back and forth like kneading dough, causing excessive gluten formation from the flour proteins and compromising the final product.
The correct technique is the “folding method” or “cutting-and-folding method.” When making cake batter, for example, fold whipped egg whites into the yolk mixture in multiple additions. After each addition, use a rubber spatula to cut into the batter from the 2 o’clock position, fold downward to the bottom, then lift from the 8 o’clock position while rotating the mixing bowl. This ensures even blending without circular stirring. Circular stirring overworks the proteins in the flour, forming gluten strands that result in a dense cake texture or even collapse.
When preparing cookie dough, maintain a gentle approach. After adding flour to the butter mixture, lightly fold with a rubber spatula until fully incorporated. Avoid overmixing, as this can develop gluten in the dough, making the cookies tough and losing their crisp texture. In summary, follow the principle of “gentle, quick, and no circular motions” when mixing batter to minimize gluten development and ensure a soft, delicate texture in the final product.
VII. Preheat the Oven to Ensure Stable Temperature
Preheating the oven is an essential step in baking that is often overlooked by beginners. The purpose of preheating is to ensure the oven reaches the recipe’s required temperature before adding ingredients. This guarantees that items are immediately placed in an optimal baking environment, allowing for even heating. It prevents issues such as overbaking due to insufficient temperature, excessive moisture loss, poor texture, or distorted shapes caused by unstable temperatures.
Different baked goods require varying preheating temperatures and durations. Generally, preheat for 10–15 minutes, adjusting based on your oven’s wattage and capacity. For example, when baking a chiffon cake, the oven must be preheated to 150°C–170°C. If not preheated or preheated to an insufficient temperature, the cake’s surface cannot set quickly upon entering the oven, causing internal gases to escape easily and resulting in a collapsed cake. When baking cookies, the oven should be preheated to 180°C. Insufficient preheating causes cookies to melt before setting, resulting in deformation, sticking, and loss of shape.
Additionally, when preheating the oven, place baking sheets or pans inside to warm up as well (except for certain special materials like silicone molds). This prevents ingredients from being placed on cold surfaces, which can cause uneven heating at the bottom and affect the texture and doneness of the final product. Therefore, always preheat the oven well in advance before baking. Only place ingredients inside once the oven has reached the set temperature to ensure a smooth baking process.
VIII. Controlling Baking Time and Temperature to Avoid Over-Browning or Undercooking
Baking time and temperature are critical factors determining the doneness, texture, and color of baked goods. Different ingredients and types of baked goods require varying baking times and temperatures. Improper control can easily lead to over-browning, undercooking, or poor texture in the final product. Many beginners habitually follow recipe times and temperatures without adjustment. However, due to oven temperature variations (actual temperatures may differ from set temperatures across brands and models), this often leads to baking failures.
First, understand your oven’s “quirks.” Use an oven thermometer to measure the actual internal temperature. If it significantly differs from the set temperature, adjust the thermostat accordingly to ensure accurate baking. Second, adjust baking times flexibly based on the size, thickness, and actual conditions of your oven. For example, with the same cookie recipe, larger or thicker cookies require longer baking times, while smaller or thinner ones need shorter times.
During baking, closely monitor the product’s condition. When baking cakes, if the surface turns golden brown and springs back quickly when gently pressed with a finger, the cake is done. If it remains indented without springing back, continue baking. When baking bread, fully baked loaves emit a rich wheat aroma. Gently tap the bottom of the bread; a crisp “thump” sound indicates it’s done. A dull sound suggests the interior is still undercooked. Additionally, if the surface browns too quickly, cover the top of the oven with aluminum foil to prevent excessive browning while allowing the interior to continue baking.
IX. Cooling and Unmolding: Preserving the Finished Product's Shape
Many beginners, eager to see their creations, rush to remove baked goods from the pan immediately after baking or even eat them while still hot. However, cooling and unmolding are crucial steps in the baking process. Improper handling can cause the finished product to deform or crumble, affecting both appearance and texture.
First, demolding: Different pan materials require different methods. For nonstick pans, after baking, remove the pan and place it on a cooling rack for 5-10 minutes. Once the pan and baked goods have cooled slightly, gently push the edges of the pan with your fingers or run a spatula around the inner edge to release the baked goods easily. For standard metal pans, coat the interior with a thin layer of butter and dust lightly with flour (or line with parchment paper) before baking to create a non-stick barrier. If the baked goods stick stubbornly, avoid forceful removal. Instead, chill the pan in the refrigerator until the contents firm up slightly before attempting to unmold, preventing breakage.
Next comes cooling. The purpose of cooling is to evenly distribute moisture and heat within the baked goods, resulting in a more stable texture while preventing deformation caused by excessive heat. For example, after baking a chiffon cake, immediately invert it onto a cooling rack. Allow it to cool completely before removing from the pan. This prevents the cake from collapsing under its own weight and allows moisture to evaporate more effectively, resulting in a lighter, fluffier texture. If not inverted to cool, trapped heat prevents moisture from escaping, leading to a damp bottom and inferior texture. After baking cookies and biscuits, allow them to cool on the baking sheet for 2–3 minutes until they set slightly before transferring to a cooling rack for complete cooling. This prevents them from shattering due to excessive heat.
X. Accumulate Experience, Dare to Experiment and Adjust
Perfect baking doesn’t happen overnight. Even after mastering the above nine secrets, you need to practice constantly and accumulate experience to truly enhance your baking skills and consistently produce delicious baked goods. Every baking enthusiast will encounter setbacks—burnt cookies, collapsed cakes, or bread that fails to rise. Yet these failures are invaluable lessons. By analyzing why things went wrong and adjusting your approach, you’ll steadily improve.
During the baking process, cultivate the habit of keeping detailed records. Document each recipe, ingredient quantities, step-by-step procedures, baking times and temperatures, along with the final texture and appearance of the finished product. If issues arise, refer back to these notes to analyze causes—for example, a collapsed cake might stem from under-whipped egg whites or insufficient baking temperature. or overly hard cookies might stem from gluten development in the flour or excessive baking time. Through continuous reflection and refinement, you’ll gradually discover techniques suited to your personal style and oven, steadily honing your baking skills.
At the same time, be bold in trying new recipes and categories, and don’t limit yourself to familiar baked goods. When experimenting with new recipes, start with simpler ones and gradually challenge yourself with more complex categories—for example, begin with cookies and muffins before attempting chiffon cakes and bread. If you encounter issues during the process, consult baking tutorials, seek advice from experienced bakers, or find solutions through repeated experimentation. Only through continuous practice and exploration can you truly appreciate the joy of baking and create your own perfect baked creations.